The Smartlead x HubSpot SmartAgent integration enables automated contact management between Smartlead campaigns and your HubSpot CRM.
When a lead replies to a Smartlead campaign or meets a defined trigger condition, a SmartAgent can search for the contact in HubSpot, create a new contact if one does not exist, or update the existing contact record with current data - all without manual intervention.
Search contact by email
Create contact (if not found)
Update contact (if found)
Before setting up this integration, confirm the following:
An active Smartlead account with SmartAgents access
A HubSpot account with permissions to authorize OAuth integrations
At least one active Smartlead campaign with leads
Slack connected to SmartAgents (required if using Slack notification steps in the workflow)
From the left sidebar in Smartlead, navigate to SmartAgents.
Click on Integrations.
Locate HubSpot in the integrations list and click Connect.
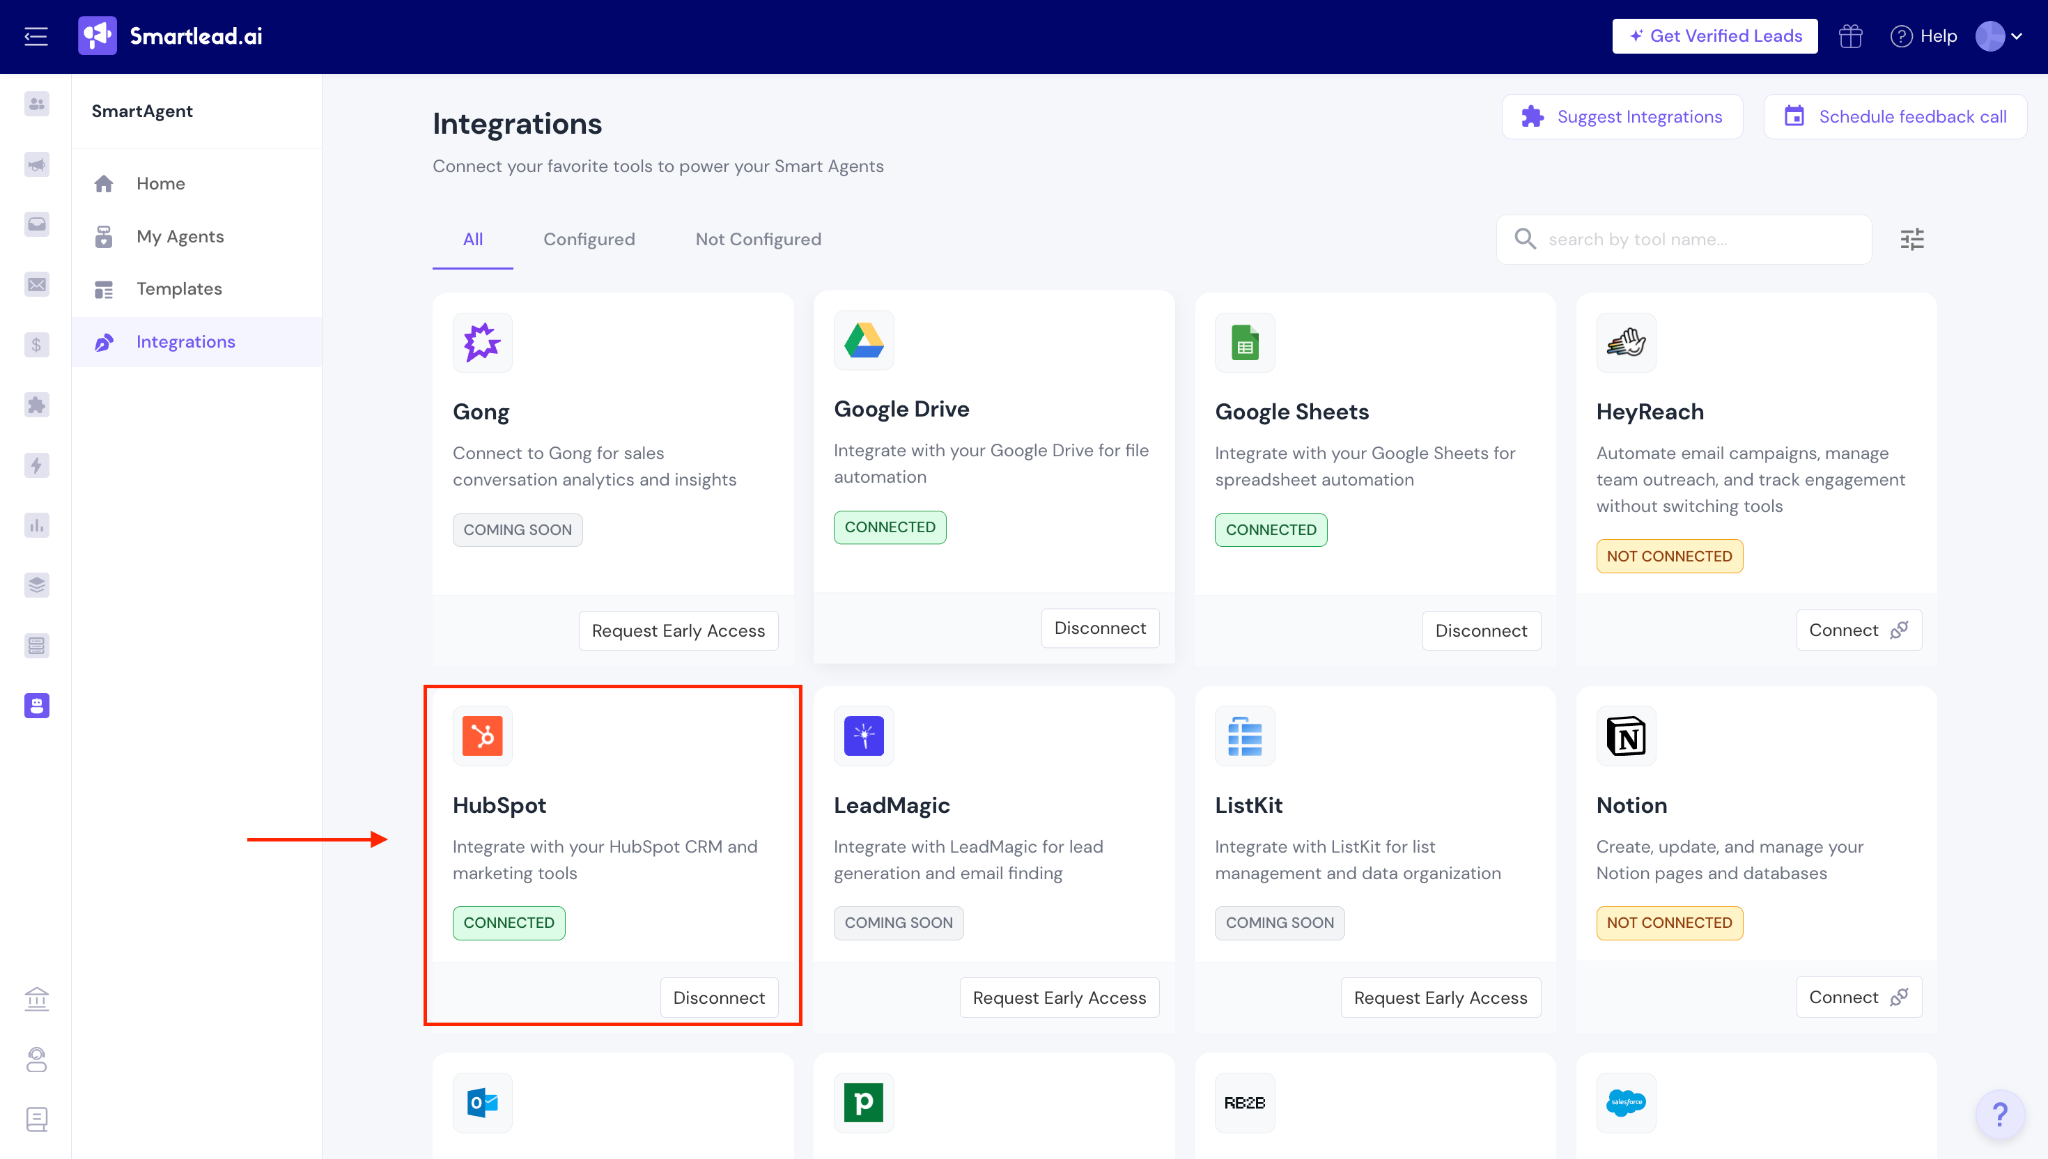
You will be redirected to HubSpot's OAuth authorization page. Log in with the HubSpot account you want to connect.
Review the requested permission scopes and click Authorize.
Once authorization is complete, you will be redirected back to Smartlead. Confirm the HubSpot integration status displays as Connected.

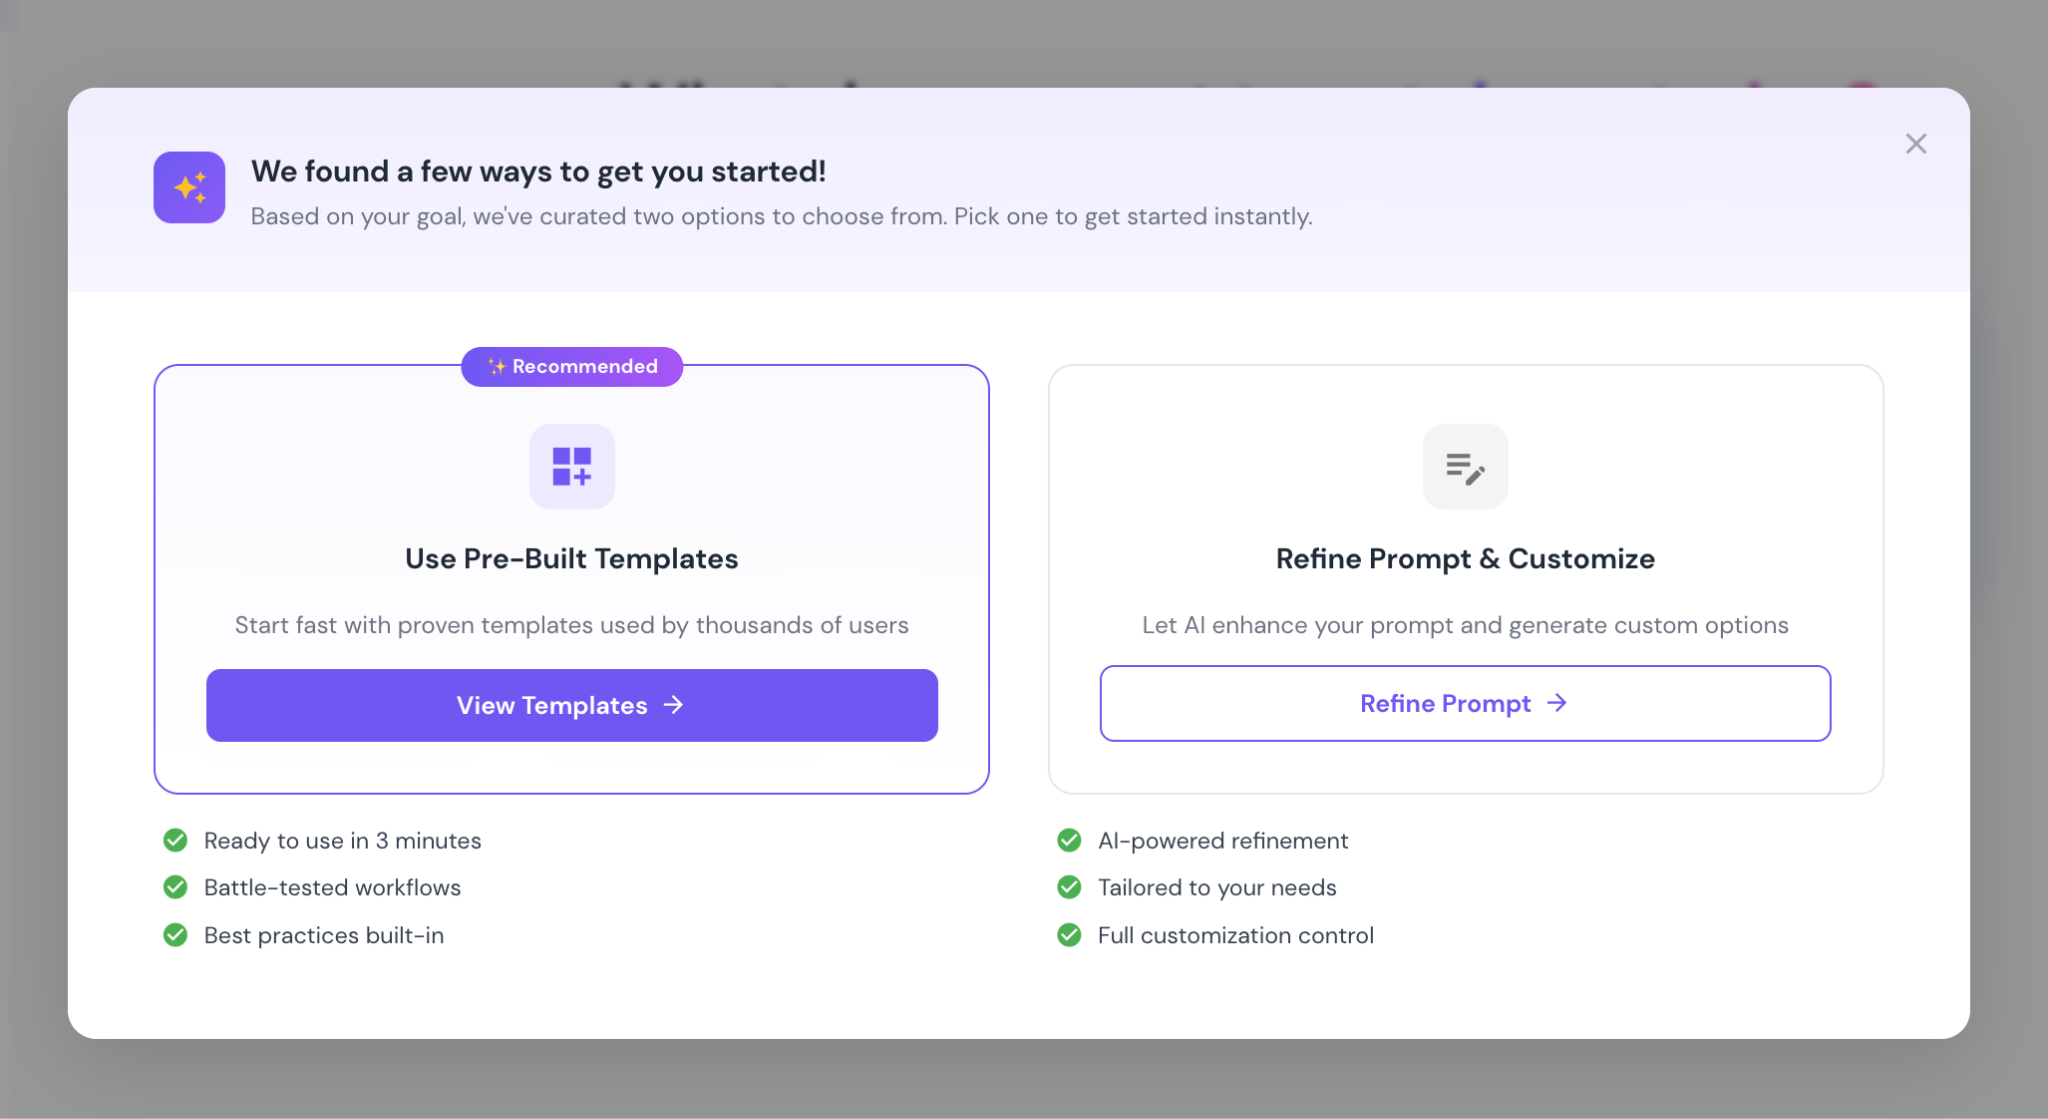
There are two ways to create a SmartAgent for the HubSpot integration: using a pre-built template or building from a custom prompt.
Smartlead provides two pre-built templates for HubSpot CRM sync workflows.
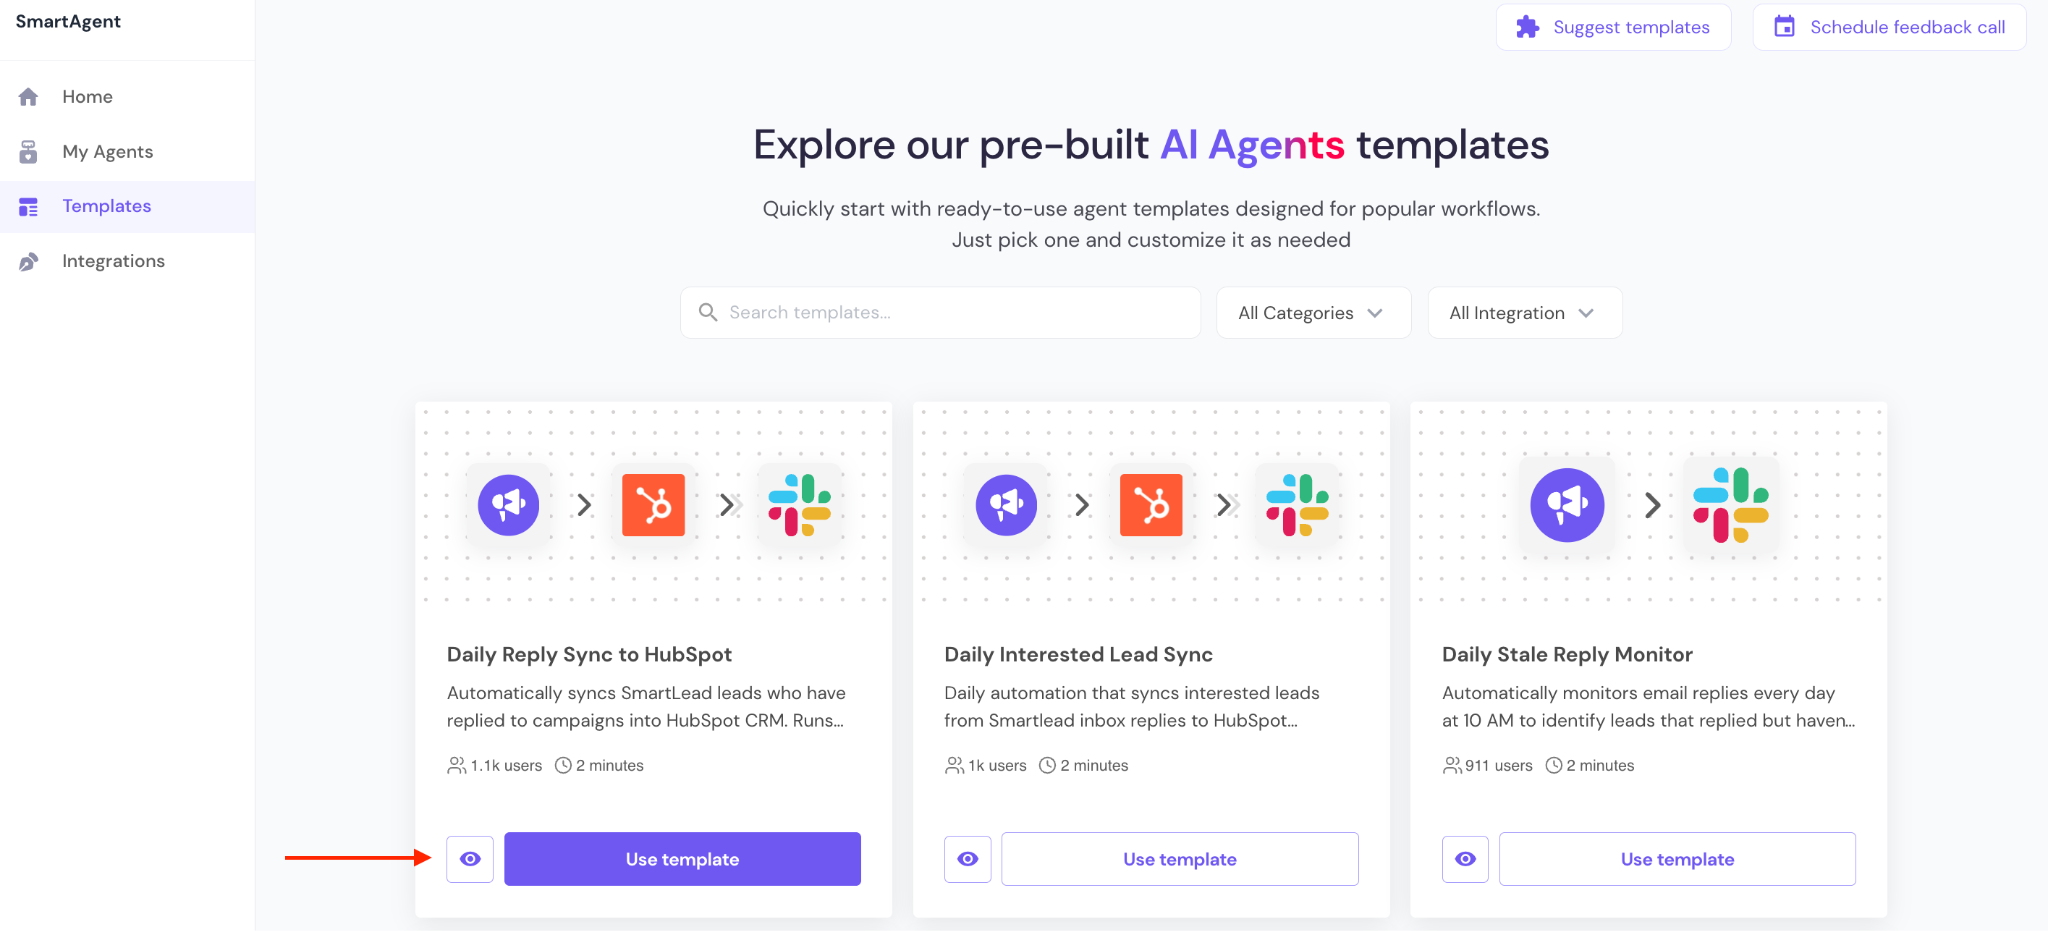
Template 1 - Scheduled CRM Sync (Replied Leads)
Automatically syncs Smartlead leads who have replied to campaigns into HubSpot CRM. Runs daily at 9 AM, processes only unsynced leads, updates sync status, and reports results to Slack.
Template 2 - Inbox Reply Sync with Upsert
Daily automation that syncs interested leads from Smartlead inbox replies to HubSpot contacts. Automatically creates or updates contact records with email, name, and company details. Sends a Slack notification with a sync summary. Prevents duplicate records using upsert logic.
To use a template:
Go to SmartAgents → Home.
Browse the available templates and select the HubSpot sync template that matches your use case.
Review the pre-built workflow. Templates include a structured workflow but require you to configure triggers and connect required apps before deployment.
Proceed to Step 3 to configure your trigger.
If you have a specific workflow requirement not covered by a template:
Go to SmartAgents → Home.
In the prompt field, describe the task you want the agent to perform.
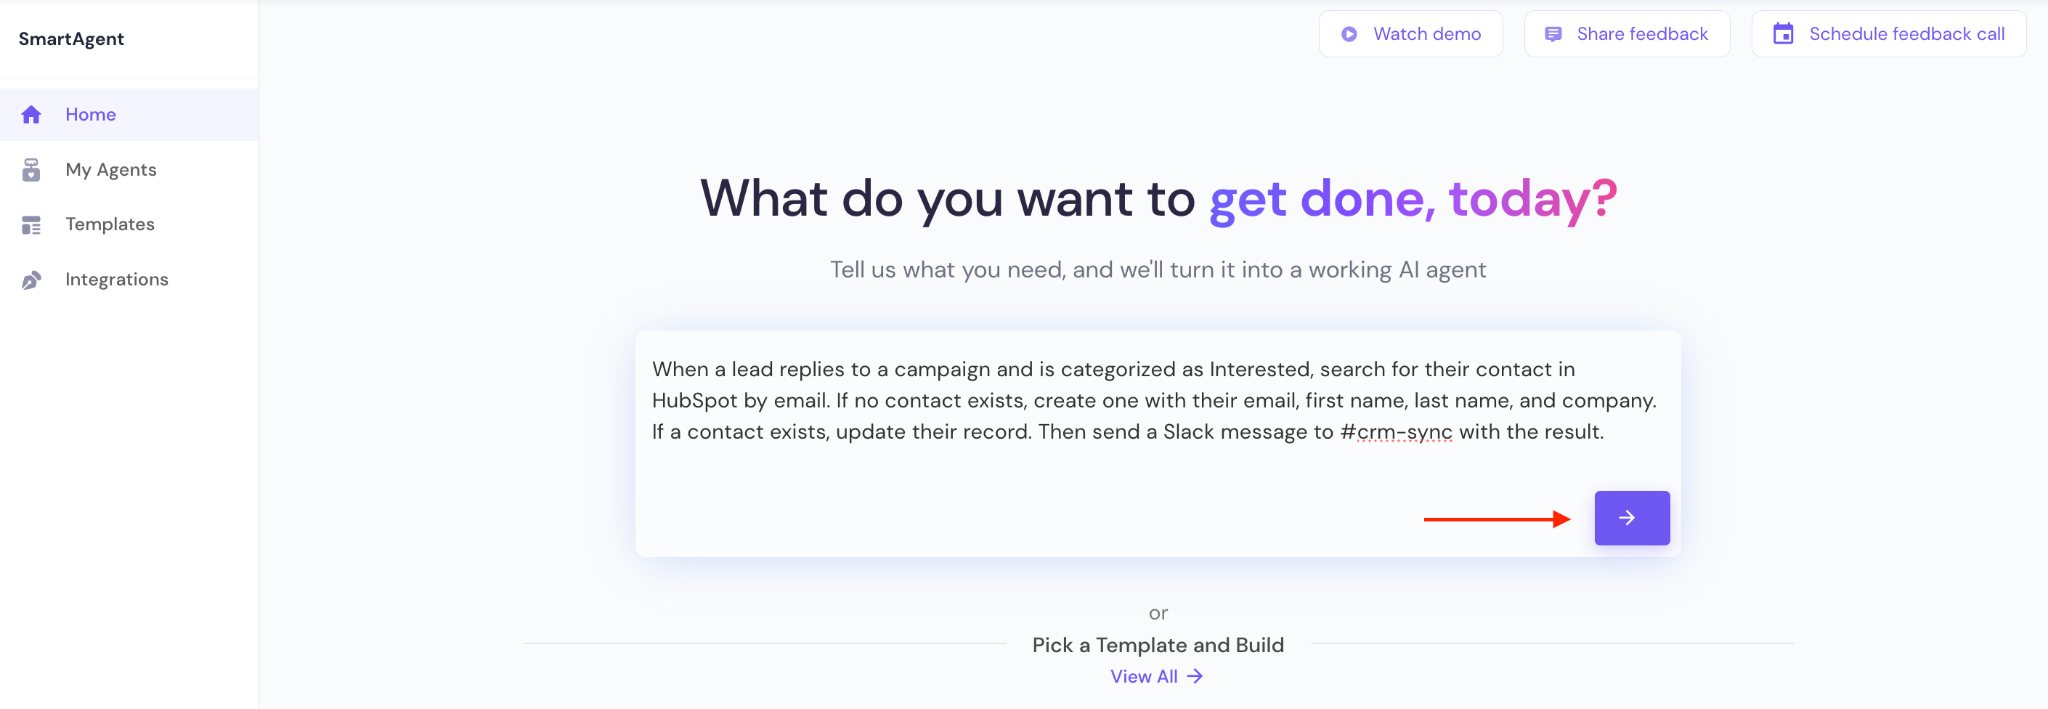
Be specific about the trigger condition, the HubSpot action, and any notification steps.
Example prompt: "When a lead replies to a campaign and is categorized as Interested, search for their contact in HubSpot by email. If no contact exists, create one with their email, first name, last name, and company. If a contact exists, update their record. Then send a Slack message to #crm-sync with the result."
Click on the continue arrow. The AI will analyze the prompt and suggest the best way to move forward.
We already talked about templates in the above section, so let’s move to the second option now.
AI will further enhance the prompt for you, or you can always choose to go with the original prompt.
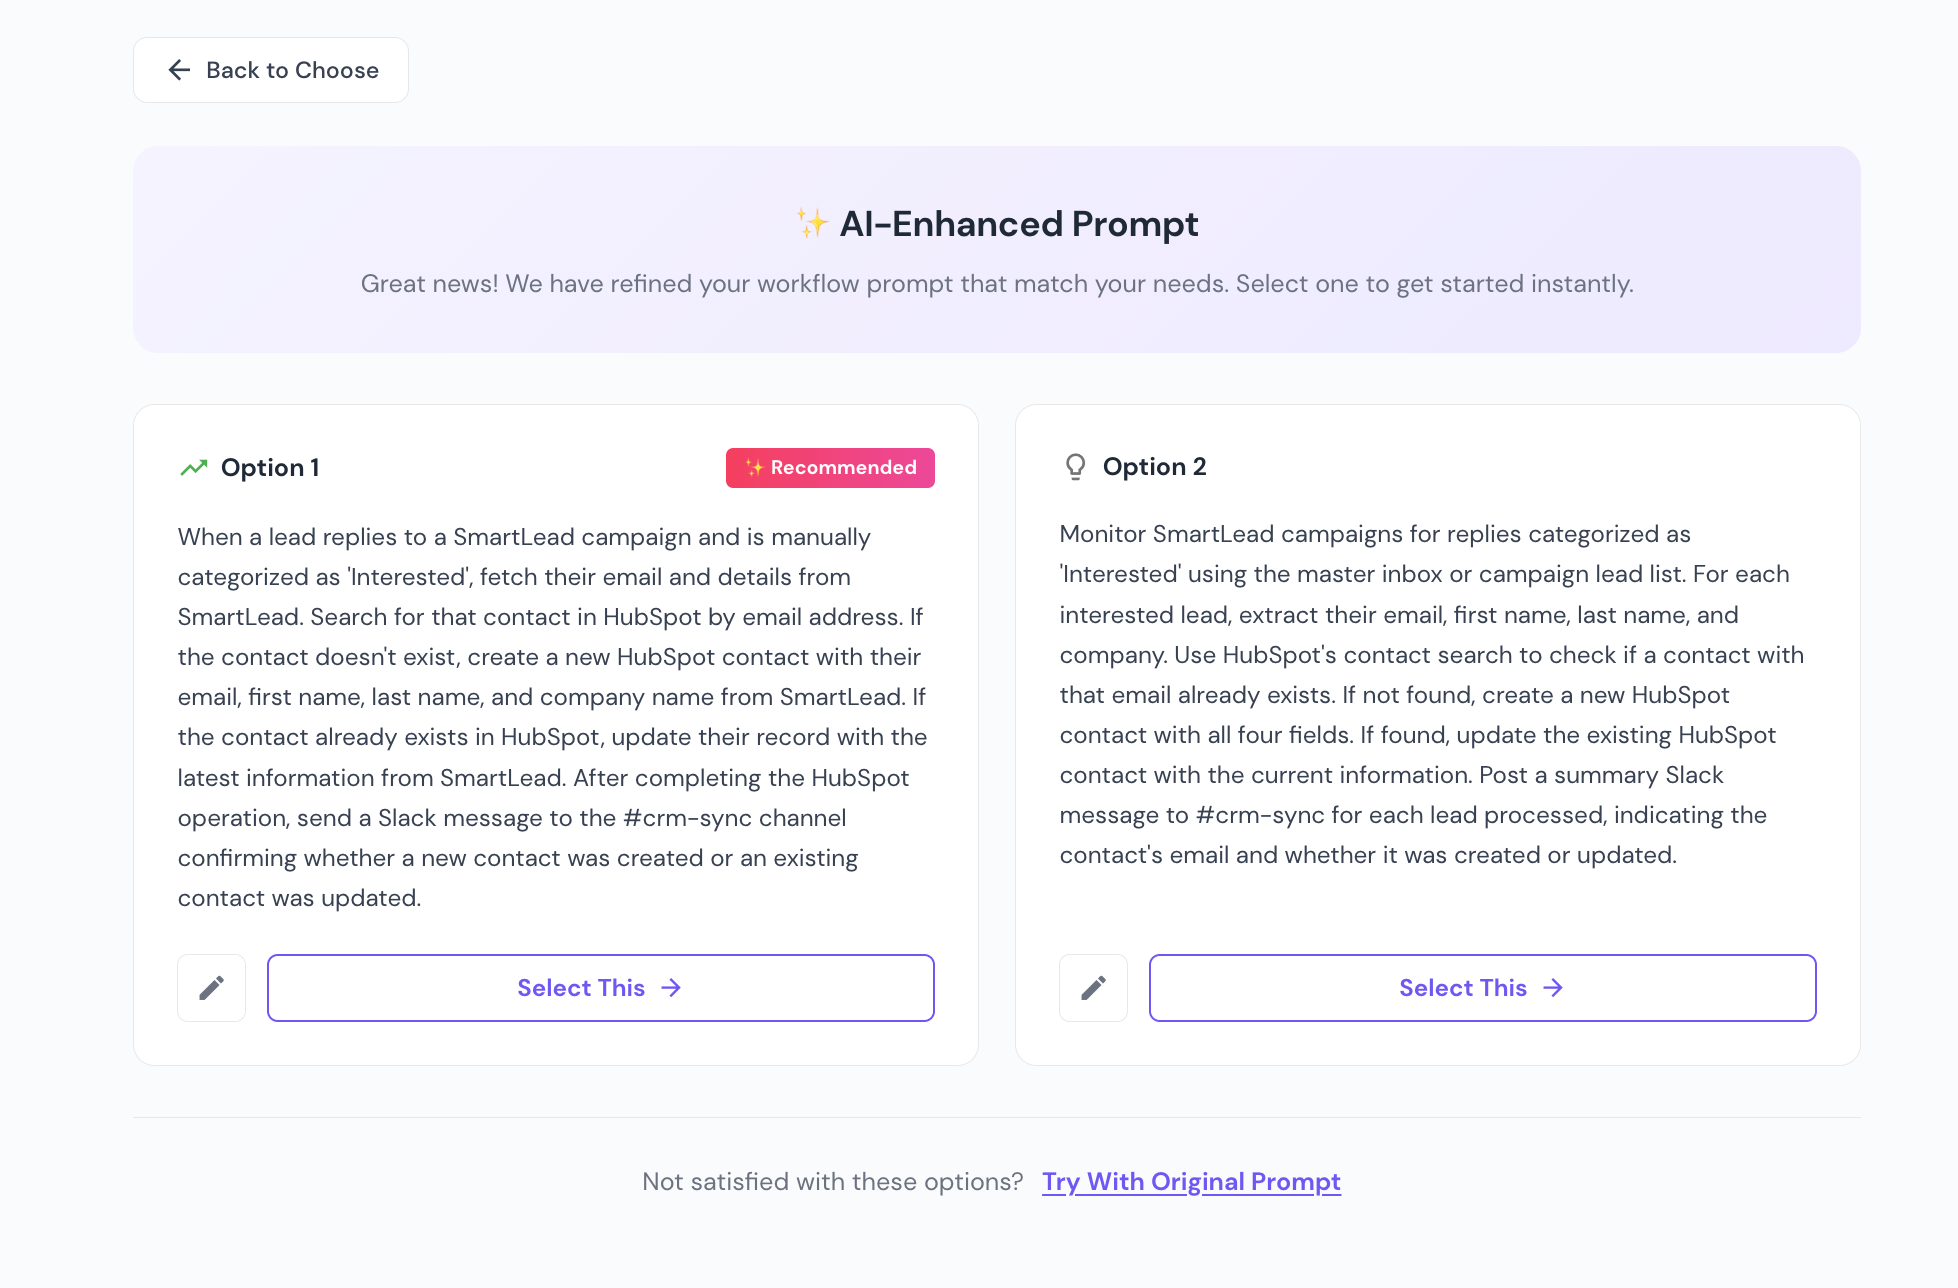
Once you select one option from the above, you will be taken back to the prompt screen from where you need to click on Start Building to proceed.
Before the agent is built, you must define when it should run. SmartAgents support two trigger types:
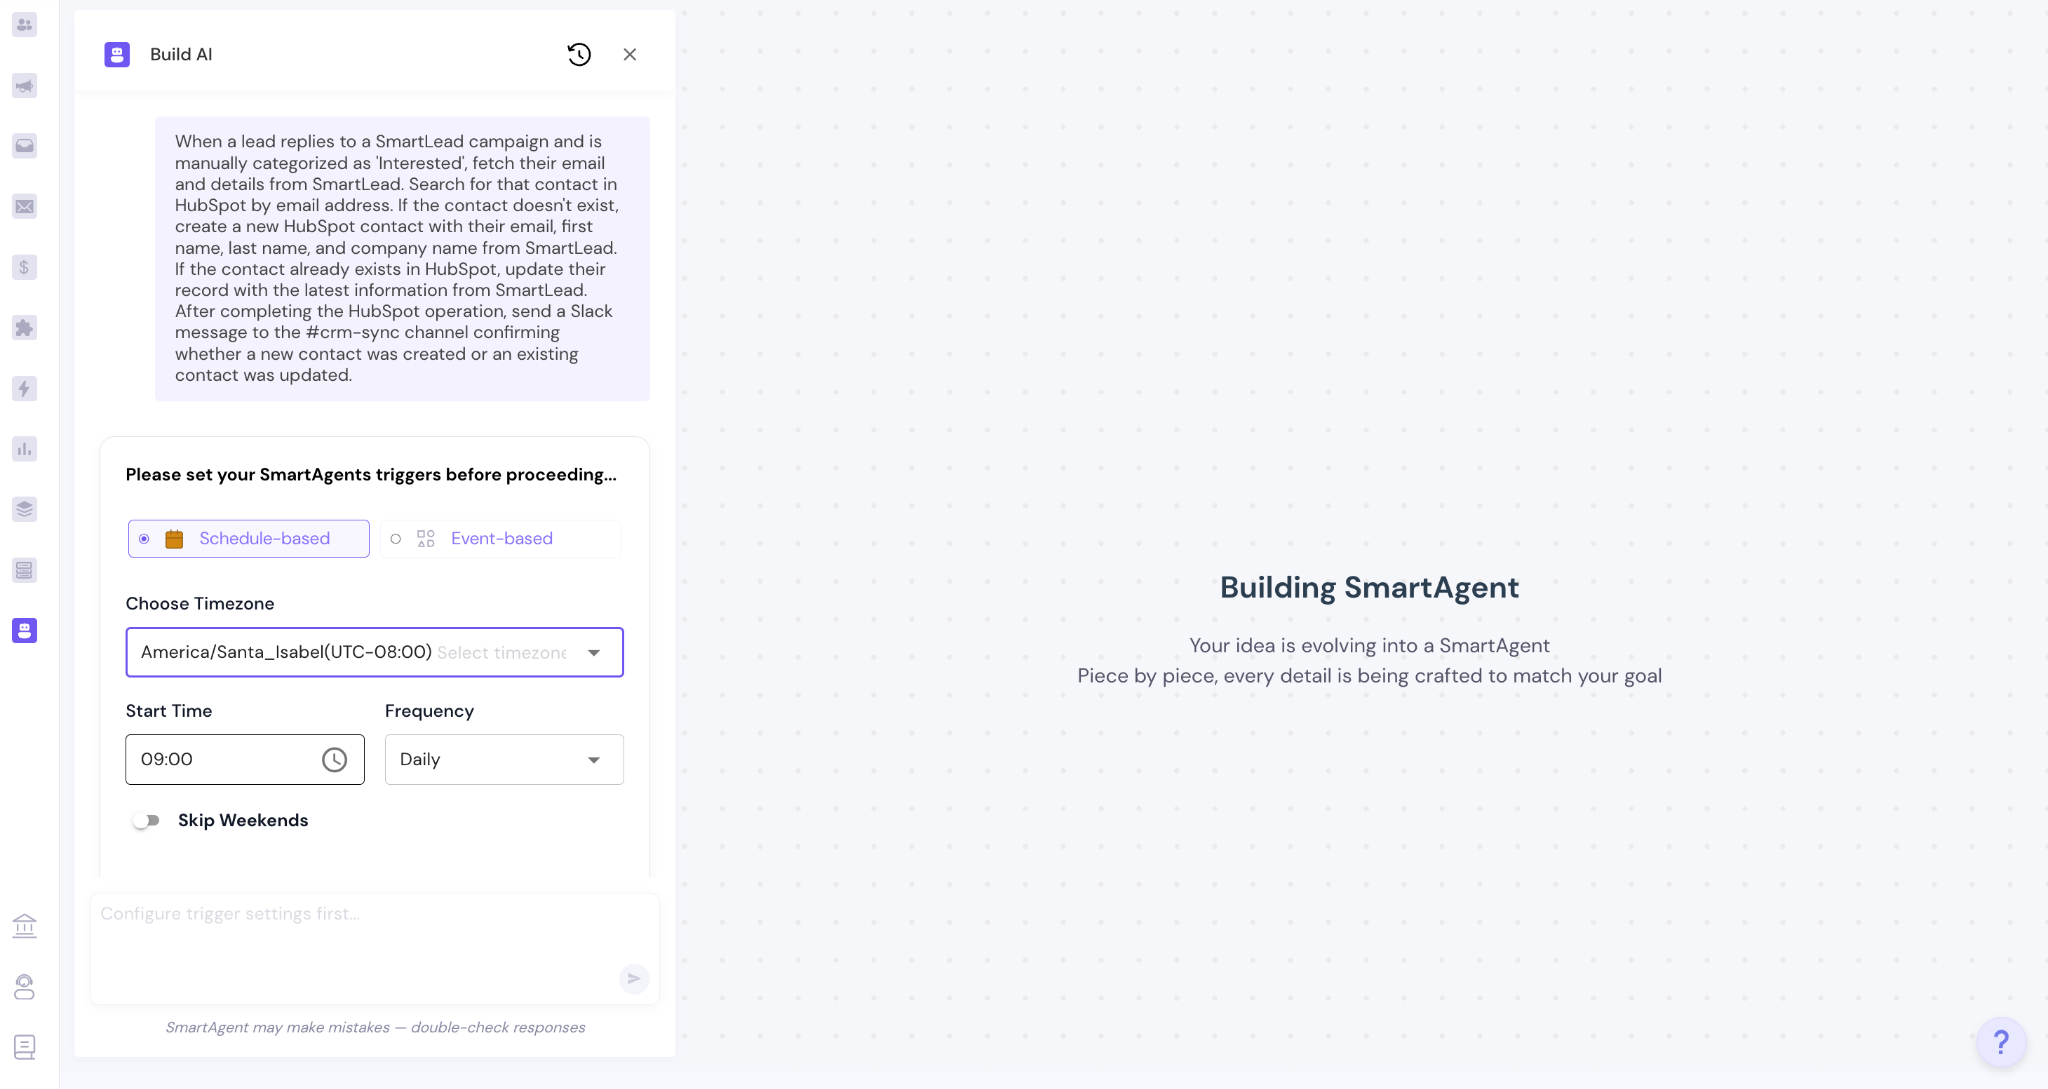
Schedule-Based Trigger
Use this for batch sync workflows (e.g., Templates 1 and 2 above).
Set the time, timezone, and frequency.
Toggle Skip Weekends if needed.
Click Proceed once the schedule is configured.
Event-Based Trigger
Use this to trigger the agent in real time based on campaign activity.
Select the scope: Account-Level, Client-Level, or Campaign-Level.
Choose the event type — for example, Email Reply, Lead Category Update, or Email Link Click.
Confirm any event-specific conditions.
Click Proceed.
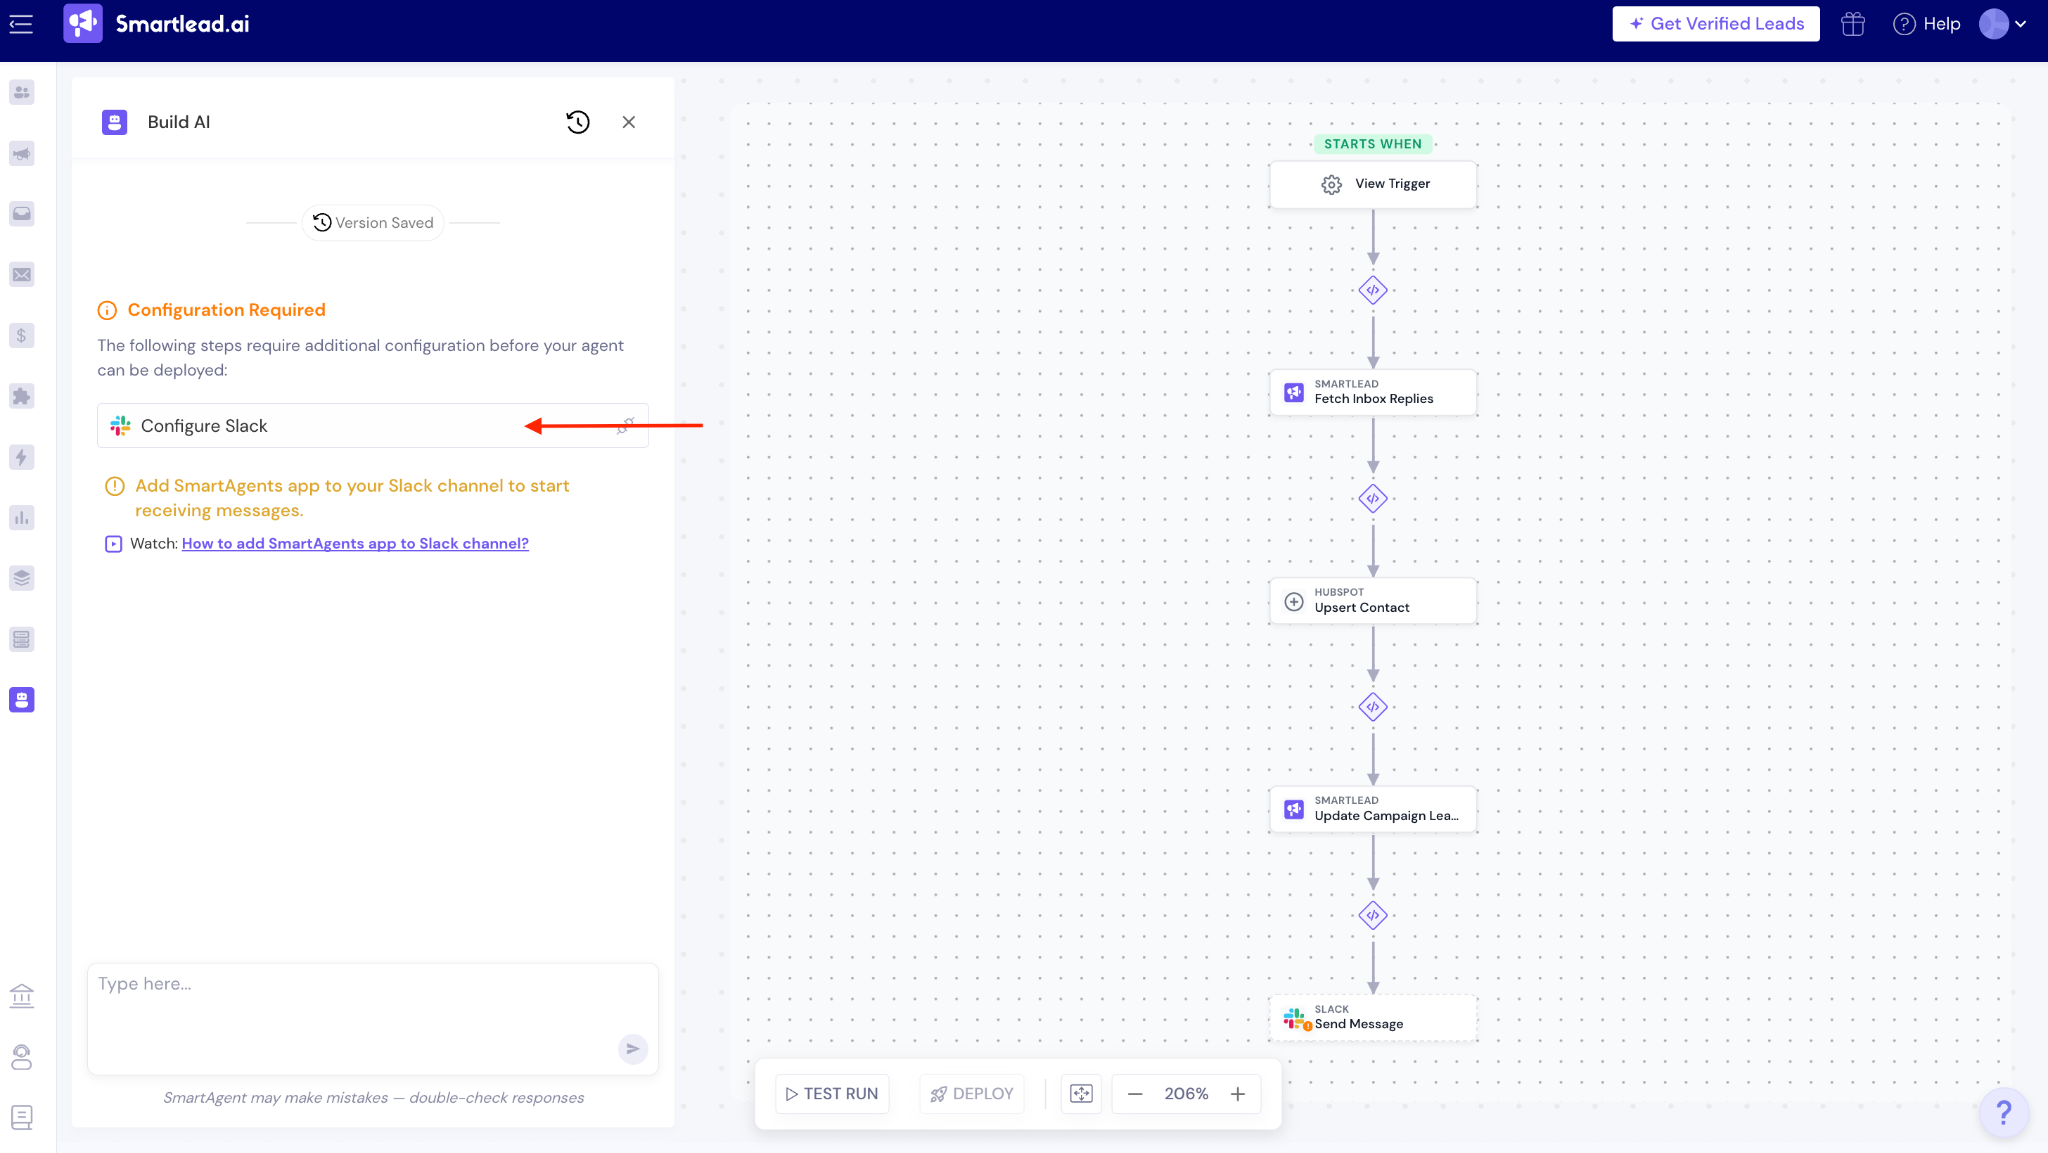
After clicking Build Agent, Smartlead generates the complete SmartAgent workflow based on your prompt and trigger configuration.
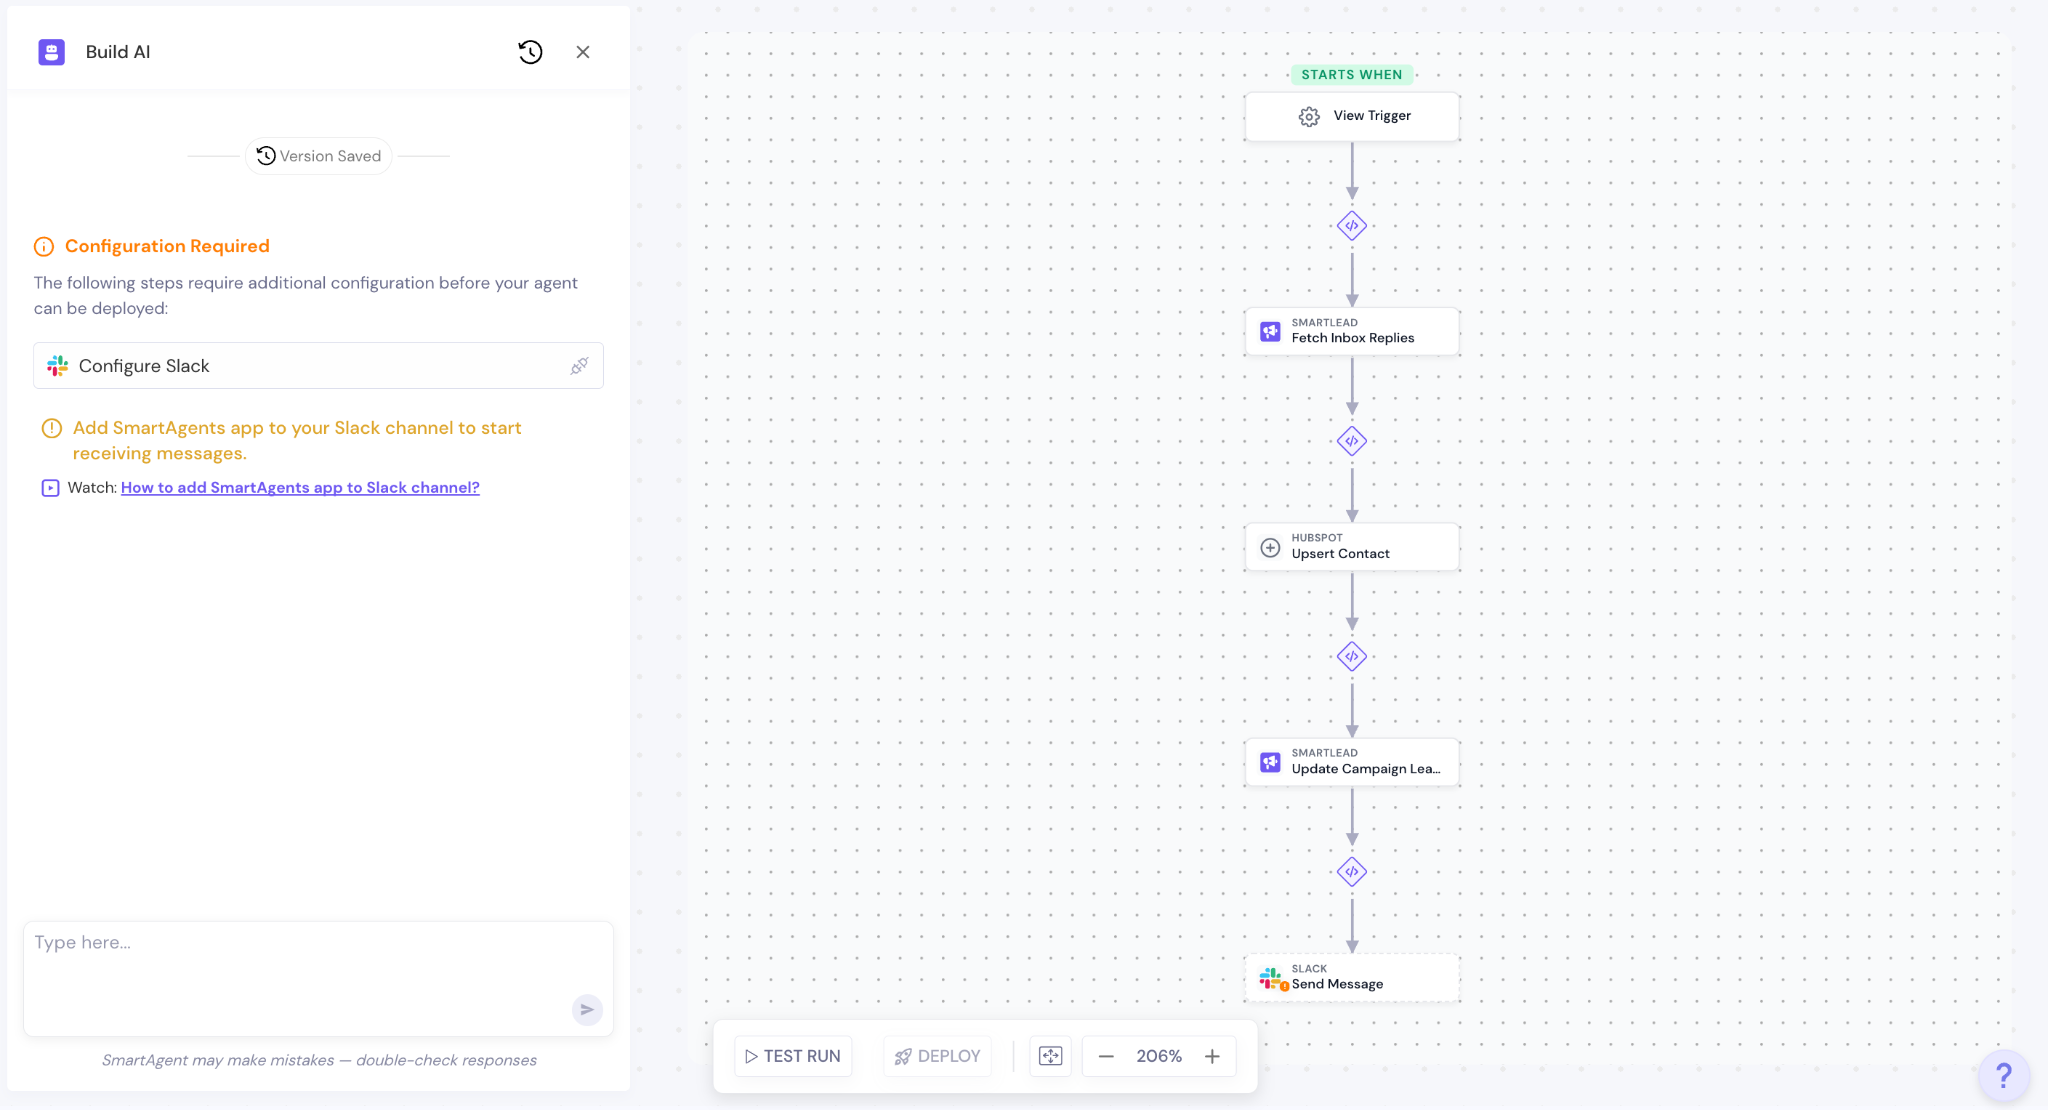
The workflow is displayed as a visual flow, top to bottom. Each node represents a single action in the execution sequence.
The HubSpot integration workflow typically includes the following steps:
Trigger - scheduled time or campaign event fires
Fetch Inbox Replies - retrieves relevant leads from Smartlead
AI Logic Node - evaluates each lead against defined conditions (e.g., upsert logic)
HubSpot: Upsert Contact - searches for an existing contact by email, then creates or updates the record
Smartlead: Update Campaign Lead - optionally updates the lead's sync status in Smartlead
Slack: Send Message - sends a summary notification to the configured Slack channel
To review connection logic between steps:
Click the connector block between any two steps.
Select Edit Connection Logic to modify how data is passed between steps.
To restore original logic, click Reset to Default.
If any step requires additional setup, a Configuration Required notice will appear in the left panel. The most common requirement for this integration is Slack configuration.
Configure Slack:
In the left panel under Configuration Required, click Configure Slack. (check the previous screen)
Select the Slack channel where sync notifications should be sent.
If you have not yet added the SmartAgents app to your Slack channel, follow the in-app link to complete that step. The agent cannot be deployed until the SmartAgents app is added to the target channel.
Before deploying, run a simulation to verify the agent behaves as expected.
Click Test Run at the bottom of the workflow canvas.
Review the output for each step. Confirm that the HubSpot Upsert Contact step returns the expected result (contact created or updated).
If results are not as expected, provide feedback in the prompt field. The simulation will rerun with the updated instructions.
Repeat until the test output is accurate.
Once you are satisfied with the test results, click Deploy.
You will be redirected to the My Agents list page.
The agent will appear in the list with its status. You can enable or disable it at any time.
From the three-dot menu on any agent, you can:
Edit the agent
Rename the agent
View run logs
Clone the agent
Delete the agent
The following contact fields are created or updated in HubSpot based on available lead data in Smartlead:
Email address
First name
Last name
Company name
Upsert logic works as follows:
The agent first searches HubSpot for an existing contact matching the lead's email address.
If no match is found, a new contact is created.
If a match is found, the existing contact record is updated with the latest data from Smartlead.
Duplicate contacts are prevented through this upsert mechanism.
Use precise prompts when building from scratch. Vague prompts produce incomplete or inaccurate workflows.
Run a test before deploying to production. Confirm the HubSpot upsert step handles both the create and update paths correctly.
Use schedule-based triggers for batch sync to avoid excessive API calls during high-volume campaign periods.
Use event-based triggers when real-time CRM updates are required for high-priority lead categories such as Interested or Meeting Booked.
Review run logs regularly after deployment to monitor sync success rates and catch any configuration issues.
HubSpot shows as disconnected after authorization
Re-authorize the integration from SmartAgents → Integrations. Ensure the HubSpot account used during OAuth has the necessary CRM permissions.
Configuration Required notice persists after connecting Slack
Confirm that the SmartAgents app has been added to the target Slack channel. The app must be present in the channel before the agent can be deployed.
Contact not appearing in HubSpot after agent runs
Check the run logs for the specific agent execution.
Confirm the lead record in Smartlead contains a valid email address.
Verify that the HubSpot OAuth connection is still active in SmartAgents → Integrations.
Agent runs but HubSpot contacts are not being updated
Confirm that the Upsert Contact step in the workflow is configured to pass the correct lead data fields. Review the connection logic between the Fetch Inbox Replies step and the HubSpot step.
