The Global Block List stops Smartlead from emailing the addresses and domains on it. Use it for leads who opted out, bounced addresses, or competitors. This article covers adding, importing, finding, exporting and deleting entries.
The Global Block List is not available on the Base plan.
You need write access to add, import or delete entries. Without it, you can view the list, but the buttons that change it are hidden.
Open Settings from the account menu.
Click Global Block List.
You'll see every domain and email on your list, with the columns Domain Name, Source, Type, Created At, Client and Metadata.

Click Add Block List.
In Domain (or) Email Address, type a domain such as yourdomain.com or an email address such as [email protected].
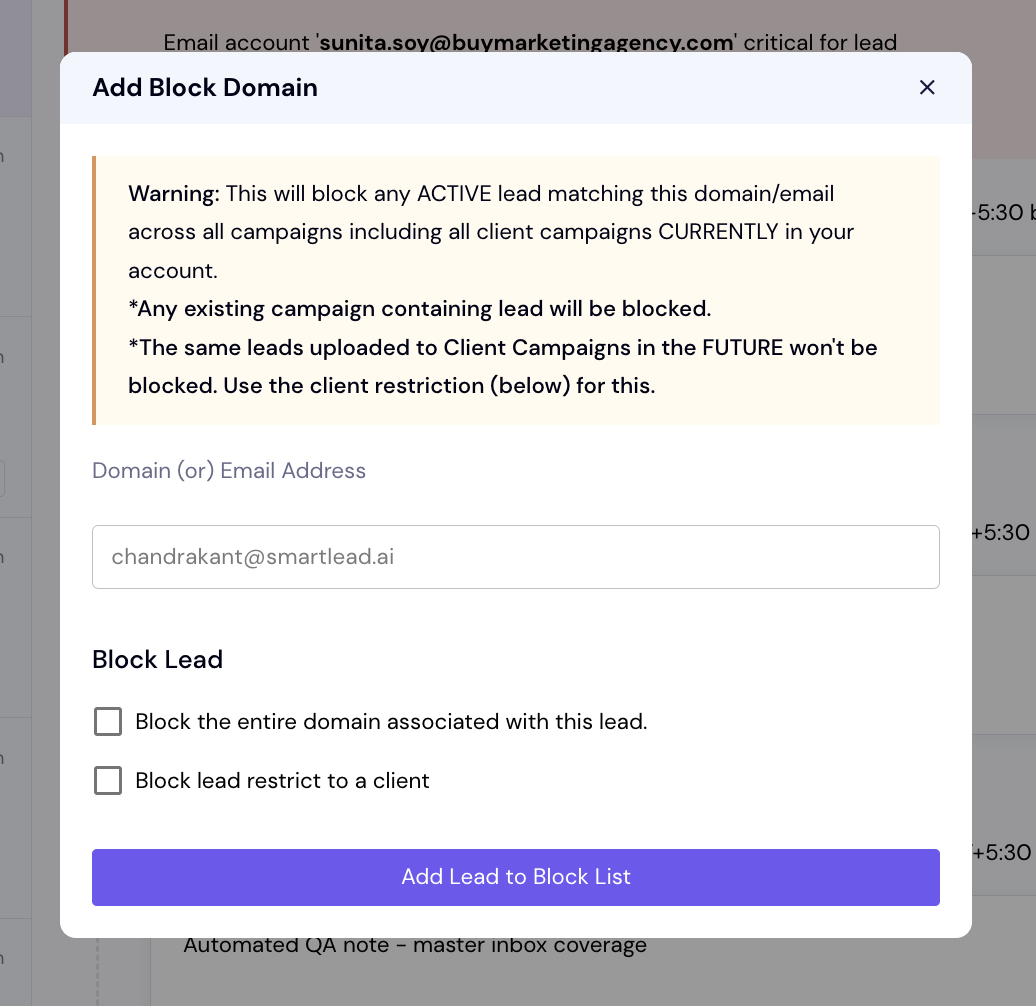
To block the whole domain of an email address, tick Block the entire domain associated with this lead. This option appears only after you type an email address.
To limit the entry to one client, tick Block lead restrict to a client, then choose the client. This option appears only when you are not signed in as a client.
Click Add Lead to Block List, or Add Domain to Block List if you ticked the domain option.
You'll see a Blocked Successfully message, and the entry appears in the list.


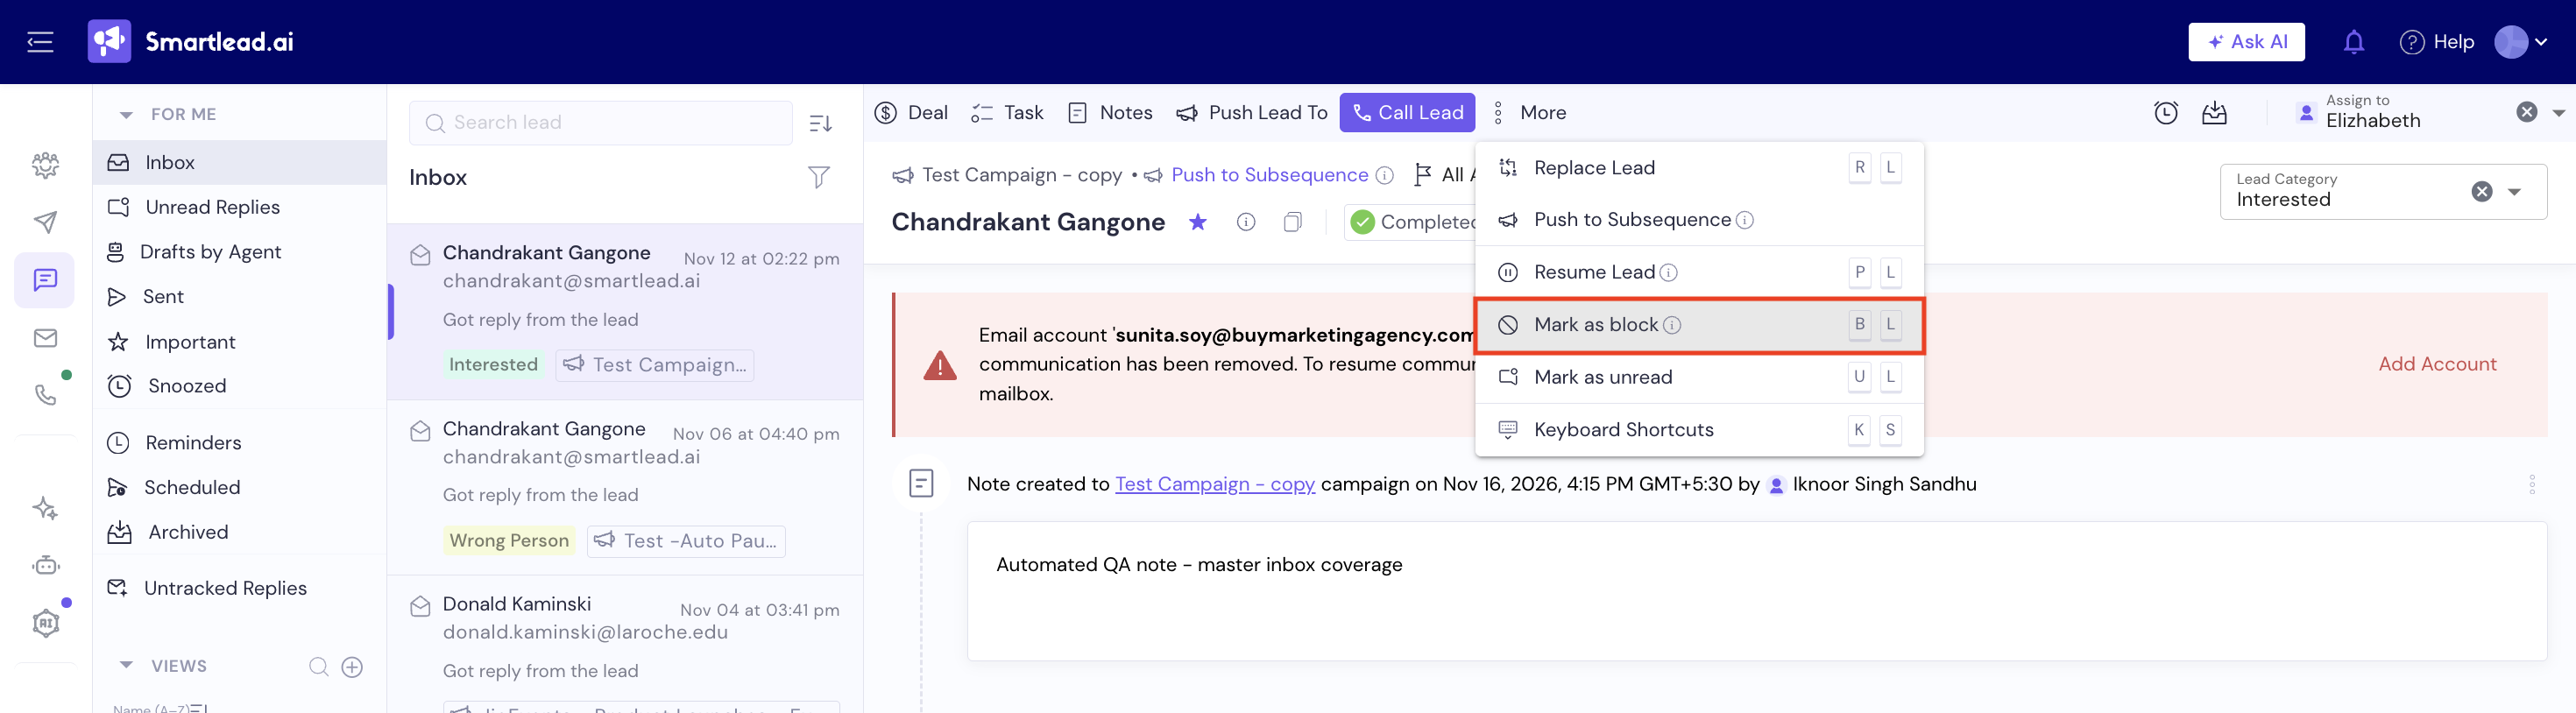
You can also block a lead while reading their reply. This needs a Pro or Custom plan.
Open the lead's conversation in Master Inbox.
Click More, then click Mark as block.
The lead's email address is filled in for you. Choose any options, then click Add Lead to Block List.
Click the arrow button next to Add Block List, then click Import CSV File.
Drag a .csv file onto the Upload CSV box, or click choose file.
Under Map Fields, choose the column with the domains or emails in Map Domain/Email Column.
Optional: under Client, tick Restrict to a client, then choose the client.
Click Import.
You'll see a Blocked Successfully message, and the imported entries appear in the list.

To find an entry, type an email address or domain in Search Block List....
To filter, click the Filter button. Tick Clients Unassigned, Soft Bounce Leads or Hard Bounce Leads, choose clients under Client Name, then click Apply.
To export, click the button at the far right of the header, then click Export List.
The list shows only matching entries. The export downloads a CSV file named Block Lists with the entries that match your current search and filter. The search and filter controls appear once the list has at least one entry.
Find the entry in the list.
Click the trash icon at the start of its row. Its tooltip reads Delete.
Click OK in the Confirm dialog.
You'll see a Deleted successfully!! message. There is no edit option. To change an entry, delete it and add the corrected one.
Apply a search or filter.
Click the button at the far right of the header, then click Delete Filtered Lists.
Click Delete in the Confirmation dialog. It shows how many leads it will delete.
Click the button at the far right of the header, then click Delete CSV.
Click the trash icon next to the file, then click Confirm & Delete.
A confirmation link is sent to the account owner's email. Open it within 24 hours.
After the link is opened, the entries from that file are removed.
An entry with no client blocks matching leads in every campaign that exists now, including client campaigns. It does not stop leads uploaded to client campaigns later. To cover future uploads for a client, add the entry again for that client.
Bounced addresses are added automatically. When an email bounces, Smartlead adds the address to the block list. Bounces caused by your own mailbox being blocked are not added.
New uploads skip blocked contacts. When you upload leads to a campaign, addresses and domains on the block list are left out. To import them anyway, turn on Global Block List in the upload settings.
An entry can't stop an email that was already sent. Emails sent before you add an entry are not affected.
Deleting an entry stops it from blocking leads from then on. Leads already marked Blocked stay blocked.
Enter the domain only, such as yourdomain.com. The form shows Invalid domain or email address for anything it can't read as a domain or email address.
Cause: the email was sent before the entry was added, or the entry is for a different client than the campaign.
Fix:
Compare the entry's Created At date with the time the email was sent.
Check the Client column of the entry against the client the campaign belongs to.
If the clients differ, add the address again for the campaign's client.
Cause: deleting an entry does not change leads already marked Blocked.
Fix: add the lead to a campaign again.
Cause: no search or filter is applied. Fix: apply a search or filter, then try again.
Cause: the email goes to the account owner, and the link expires 24 hours after the request. Fix: check the account owner's inbox. If the link has expired, click Delete CSV again and send the request again. If Smartlead says a new request can't be made yet, wait before you try again.
Still stuck? Contact support from the chat in your Smartlead dashboard. Include the email address or domain, the campaign ID if there is one, and any error text.